
A new metal filament for 3D printing is about to be shipped to our early adopters who placed a pre-order in the last month. Therefore it’s about time to share our insights and tips on printing with copperFill 3D printing filament!
copperFill
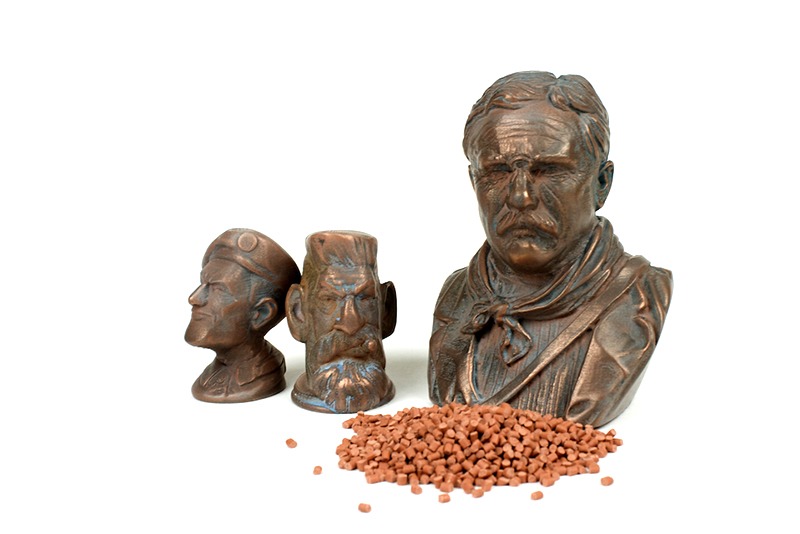
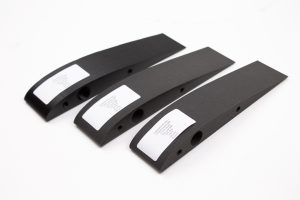
A unique PLA filament with copper powder, made for desktop 3D printers. After bronzeFill it’s obvious that ‘makers’ want to print with other metals as well. Therefore we searched for a metal that would post process just as great as bronzeFill and be a true addition to any Makers filament portfolio. CopperFill shows a real nice reddish glow just like one would expect from a copper material. Side by side with bronzeFill the difference is obvious and makes a great complementing set of of materials.
Build Platform
This filament will print great on both heated and non heated build platforms. For cold build platforms we generaly use blue painters tape which you can buy at any decent hardware store. We’ve noticed that copperFill has prety much no warping, it’s much better then regular PLA.
For heated build platforms we use a temperature of 55-60 C which will keep the print sticking to the platform. It can be printed straight on glass or with a bit of gluestick applied to it. We’ve also printed it succesfully on kapton tape with the same temperature settings.
Heat migration within filament
Heat migration within filament is an important aspect of 3D printing and usually explains why some hot-ends work better then others, but also why some filaments need different settings then others. As soon as we introduce other fibers or powders in a PLA filament we influence the way heat migrates through the filament.
With copperFill this means that heat will travel through filament more efficiently, because of the metal particles. This results in two things; it will heat up easier in your hot-end and it will cooldown faster when leaving the nozzle.
The better cool down properties when leaving the nozzle means good performance on overhanging parts, this is a big plus for printing busts that often feature overhanging parts such as the chin, nose and ears.
The fact that the filament heats up easier in the nozzle usually means for most printers to print at lower temperatures and keep the filament moving through the nozzle by printing at relatively high speeds.
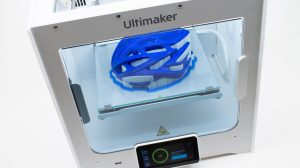
In case of the Ultimaker Original hot-end we’re noticing some issues with heat migration. Since 3mm (2.85mm) filament moves at slower speed through the hot-zone compared to 1,75 filament, there is more time for heat to migrate through the filament. This causes the filament to expand higher up, outside of the nozzle in the white Teflon piece were it can create friction. The same effect can be seen with the Ultimaker 2 hot-end. What this means is that printing with copperFill on Ultimakers requires patience and perseverance, so this is not recommended for novice users.
Slicer settings
The table below shows the most relevant slicer settings for Cura and Makerware. If you prefer to use a different slicer software you should be able to find similar settings and create your own profiles using these tables as a guideline.
[table id=6 /]
Slicer Profiles
Get the profiles by clicking the link below:
Ultimaker Original – Cura
Ultimaker 2 – Cura
Makerbot Replicator 2 – Makerware
Post processing
Post processing can be done with similar methods as the bronzeFill. One method we like best is using coarse steel wool to polish the print.
- Use coarse steel wool to polish the surface of the print. You can apply quite a bit of pressure but don’t polish a specific spot for too long, it’ll get hot and softens the material.
- The print should now look already quite shiny and exposed surfaces should be looking shimmer and be smooth without visible print lines. Next we apply a thin coat of black spray paint and immediately use a white cloth to wipe it off. Hard to reach places will stay slightly tainted black which enhances the contrast.
- Last step is using a copper polish which helps get to get the extra shine you would expect from a metal and also helps creating an interesting patina over time.

65 Comments
very good, thanks for writer.
Hi Calynm,
This is gavin, we aslo make this products,
All material data we have available can be found in the various datasheets online here: https://www.madearia.com/materials/
Just getting started with the CopperFill on a Prusa Mini with the 0.4mm steel nozzle and noticing that unlike all my other PLA prints, this one *really* doesn’t want to stick to the bed which is heated to 60°.
I’ve tried adjusting speeds, temperatures on the bed (55-80°) and nozzle (190-215°) and pretty much always getting the same results.
Interestingly when I go to remove the failed print, I’ve noticed that the material stays soft and bendy for a considerable amount of time, unlike other filaments that harden quickly. Is this possibly a humidity problem with the material? Or is this just a result of the copper mixed into the plastic?
Are there any tips for preventing the filament to stick to the nozzle while its printing? Prusa profile for this suggests to bump up extrusion multi. Prints dont appear to be overextruded but the nozzle keeps picking up filament as it lays down and eventually those blobs fall off and can cause an entire layer to be ruined depending on the size of the part.
Couple of things you can try. 1. dry the filament at 45C for 4-6 hours. 2. if the print doesn’t look overextruded you can try to increase material flow, if the flow becomes more constant it might pick-up less debris as it moves around.
Make dure the nozzle is in good condition and is mounted perpendicular to the bed in x and y direction.
is there any solvent that will smooth the surface of a model printed with copperFill? My models are very organic so it is hard to polish them with steel wool… thanks
A couple of Owls of Athena. Printed with copperfill (the base of the big one is woodfill)
The 4 owls left to right 1) as printed
2) copper wire brush
3) as 2 and ammonia salt wash for patina
4)tumbled with copper screws.
https://www.thingiverse.com/make:542293
I have gone through most of a roll and haven’t gotten a single print to come out right… I am experiencing some extreme heat creep and the filament ends up jamming and coming out the side of my extruder. I’m printing on a prusa mk3. I only have mild success when printing at 190 degrees, 125% flow, 150% speed and in spiral vase mode (no infill). I’m about ready to give up on this filament which is a shame… I love the possibilities with the copper but at this point I feel as though I’ve wasted enough time and money. Please help as I don’t want to give up on it
Dear Zack,
The material should work fine on the Prusa machines, we have experience with that ourselves.
I’ve added your questions to the support system so the team will be in contact with you.
I’m printing on a Prusa MK3S+ and those settings seem extreme. My temp is 210 first layer and then 205, flow at 120%, first layer speed 20 mm/s and max speed of 45 mm/s for perimeters. Try printing something smaller and simpler and a vase to tune your settings.
Hi,
What is the thermal conductivity for that material?
Can you produce filaments based on PC or PA for better resistance to higher temperatures?
This material is produced with aesthetic purposes in mind and therefore we have no number on the thermal conductivity.
With PLA’s relatively low Glass Transition Temperature it makes little sense to use it in such a manner.
No short term plans for such filaments at this time.
what technology of making of such filaments?
A custom PLA/PHA blend with specially sourced copper particles mixed by our material-partners creates this special material.
Hi, how long from the productiondate can a closed package of copperfill be saved (closed package) before using it ?
Hi Leo,
We have no hard numbers on this, but we reckon it should be good for at least a year – year and a half.
Keep in mind that copperFill is based on our PLA/PHA mixture which is bio-degradable.
Therefor it will slowly loose it’s mechanical properties over time.
Very nice post! There are print settings for Simplify3D?
Not at this moment. Please contact our technical support at support@colorfabb.com for specific settings.
Hi there to all, the contents existing at this site are truly awesome for people experience, well, keep up the nice work fellows.
Thank you. We do our best!
I increased the flow to 106% and now the filament keeps jamming in the extruder. What can I do to prevent this?
If it did work at 100% but stopped at 106% flow you could start with decreasing speed slightly and/or increasing temperature slightly.
When you keep having issues please contact us at support@colorfabb.com with more detailed information so we can get a better idea.
Thanks for the answer! No it also didn´t work at 100 % otherwise I wouldn’t ask. But I just oiled the filament and now it works
Which Spray paint is recommended? I have a Montana Gold spray paint for streetart. Will I be able to wipe it off, too?
Hi Andreas,
No experience, but I reckon it should be OK. You’ll be wiping it off while it’s still wet so it should be no problem.
What size nozzle works the best for the copper-fill?
Most of our prints are done on standard 0,40mm nozzles so this should work for you as well.
Though a bigger nozzle will generally work better if you have the option.
Hi,
Plz let me know whether copper fill PLA filament can be used for flashforge finder 3d printer.
We have no experience with the Flashforge Finder 3D printer ad so cannot tell you whether this will work or not.
Most printers however should work provided you have control over basic settings like speed, temperature and retraction.
Our webshop and various resellers worldwide can provide you with samples at a low price to test before buying a complete spool.
Hi,
I wonder what’s the thermal conductivity of copperfill?
If I assume it’s made out of 60% PLA and 40% copper and assume that PLA has 0,29W/m*K and copper has 380W/m*K I get a lambda of 152,2W/m*K for copperfill.
Are these assumptions right? What about density? Is 4,3g/cm^3 realistic?
Hi Josef,
We have no specific data about the thermal conductivity but there is little to no conductivity in copperFill due to the dominance of the base material, PLA/PHA.
The material is intended as an aesthetic material primarily.
Please keep in mind that due to the mix with PLA/PHA the Glass Transition temperature is relatively low so thermal applications will be limited.
There is roughly 80% metal in the filament by weight.
Both FAQ’s can also be found here in our Frequently Asked Questions list.
The datasheets of our materials, including the density, can be found on our materials page.
For copperFill this is listed as 4,0 g/cm³.
We have a reel of 1.75mm Colorfabb Copperfill filament – it is 750grams but doesn’t specify length – do you have a figure for how many metres is on a spool? (Or metres per gram?)
Hi Jason,
We’ve got a table which specifies the length of filament for various materials: https://support.colorfabb.com/solution/articles/13000000067-what-is-the-length-of-filament-on-your-spools-
best,
Gijs
Is any type of spray paint preferred, like water-based, acrylic, etc?
Hi Andy,
For this application a water-based paint should work fine, apply it and quickly wipe it off again.
Normally most paints suited for plastics should work.
For these materials we generally only use a clear coat of automotive paint from Motip.
You can also take a look here for some more experiences with painting, nGen in this case: https://learn.colorfabb.com/stormtrooper-painting-session/.
If you have try something which works well please share so we can all learn.
I used acrylic (not spray but a thin ink then wiped it off). That step came out great but the polished piece is more shiny then the non-polished one. Thoughts?
How do you get it to green?
Patina will form due to over time with moisture and air, so it won’t work if you coat it with a paint.
A clear coat is actually used to stop the material from forming patina.
Patina can form manually over time or you could speed it up.
Here’s a DYI method: https://www.3dhubs.com/talk/thread/bronzefill-patina-processing
I was wondering if you have any information on the thermal conductivity, coefficient of thermal expansion, and heat deformation temperature of your copperfill product.
Hi Calynm,
Besides the Tg of around 50c – 55c (because of the PLA/PHA carrier) we have no real data on this.
All material data we have available can be found in the various datasheets online here: http://colorfabb.com/materials
just printed a keychain with copperfill on my selfbuilt/designed 3d printer. perfect at 1st try.
1.75mm, filament, nozzle 0.6mm. speed 50mm (bottom at 30mmsec) temp 210c. polishing to achieve copper finish is a quite hard work but stunning result!
Would I be able to print metal filament using a 0.2mm nozzle?
Printing metal filled filaments with a 0,2mm nozzle diameter.
We have seen it done before with bronzeFill on a 0,25mm diameter, but keep in mind that you will have a hard time to get the settings just right.
With the smaller nozzle diameter you will have a very small amount of material flow and these filaments can be tricky with longer residence time inside a heated nozzle.
Maybe when experimenting with more cooling on the hotends cold-zone to counteract the long residence times?
Let us know how it goes 🙂
Hi,
you mentioned copper polish, do you have some home receipts for it? I read something about lemons and salt. what did you use?
Cheers
Hi,
We used a polish called Brasso, which is a copper polish you can find in the grocery store here.
If you try any other (home) recipes or methods, please share your results with the community.
does the copperfill have electrical continuity?
Hi Shane,
It does not in any significant or useful amount.
Even with the relatively high copper content inside, there is still PLA between the copper particles blocking the transferring of electricity.
After testing some samples, i noticed the copperfill filament cools down very fast, suspecting a good heat conductivity. On a personal project, i need some kind of heat sink and after trying different things, it appears that printing one is probably the most elegant solution.
Do you think this could work considering my heat source will never go over 60°C ?
Hi Jo,
This might work a bit, but remember that there’s still also plastic in the material.
Therefore it will not work nearly as good as a normal heat-sink and the dangers of deformation due to overheating might mean that as the heat goes up, the effectiveness of the heatsink goes down.
So please take all necessary precautions and do a lot of testing.
But if you do try it, let us know how it works out so we can learn from your experience.
The downloadable Makerbot 2 profile no longer seems to work. I went in and manually created a new one. My biggest issue was getting the copper fill to stick to the plate. I use BuildTak surface which is great for PLA but not so great for copperfill. Putting down a raft first makes it print great but I am not too keen on using so much of the copper fill for a disposable raft.
Hi Dennis,
We’ll take a look at the profile.
Printing metal filled parts on the Makerbot Replicator 2, we generally use blue painters tape to keep the parts on the bed. With that we generally don’t need a raft.
Hi, I am interested in trying this. One question. Am I able to solder to the printed model? I am interested in using it for metalsmithing but if I can’t solder to it not sure it is a usable item for me. Thanks
Hi Bob, IDK for sure and I’m interested to try this as well, but if I had to guess I would say that you won’t be able to solder to it. Since it sounds like just rubbing steel wool over it generates enough heat to warp the plastic the high temperatures of soldering would most likely melt it as well. I’ll let you know what I find out when I try though.
if i can’t solder to it it’s rather useless for jewelry work then.
I ordered a sample of it and have a soldering iron at home. If I don’t get back to you in about a month ping me and I’ll let you know my results.
thank you that would be most helpful!
Hey, I know this is 1.5 years later, but
were you able to solder to it?
Although we have not tried it, please keep in mind that the filament still contains quite a bit of PLA/PHA.
I expect soldering will not yield any kind of positive or useful result.
Please keep in mind that due to the mix with PLA/PHA the Glass Transition temperature is relatively low so thermal applications will be limited.
Can anyone advise the best way to store copperFill and bronzeFill filament when not in use. Does it need to be sealed in an air tight container with dessicant?
Hi steve,
Probably not necessary but it won’t hurt either.
Gijs
I just printed something with Copperfill, 199 celcius, 0,1mm layer heigt and 50mm/s
Hi Sammie! Looking great, the red glow of the copper looks great. Can you share some tips on how you post processed the 3D print?
I just followed the steps given by Colorfab (step 1-3 under the article above). It just works :). Polish with coarse steel wool, apply thin coat of black and remove it with a white cloth and then some copper polsish to give it that shine again.
that’s great!
Very helpful post. I have the Bronze filament but I have not had a chance to print wit it.
Hi Ralph, we have a tutorial on bronzeFill too! Time is always against us…